
Amazon EKS Clusters Setup – Step by Step Instructions

A production-quality Kubernetes cluster requires planning and preparation. If your Kubernetes cluster is to run critical workloads, it must be configured to be resilient.
There are several deployment tools to do the Kubernetes cluster steps:
- Bootstrapping clusters with kubeadm
- Installing Kubernetes with KOPS
- Installing Kubernetes with Kubespray
- Turnkey Cloud Solution
We are going to use Turnkey Cloud Solution (Amazon EKS), using EKSCTL utility we are going to manage the production ready cluster.

There are several cloud providers who support creating of Kubernetes cluster setup, this blog concentrates on creating of cluster on amazon EKS.
First, we are going to launch a Linux instance (t2 micro), this instance is used to manage the k8s cluster and give all the necessary instruction to Kubernetes cluster using EKSCTL and KUBECLT utility.

Allow SSH, HTTP and HTTPs traffic to that instance, rest leave as default and launch instance.

SSH to machine using public IPv4 address.
Check the AWS CLI version, using “aws –version” command. Better to refer below link to use the current AWS CLI version:
https://docs.aws.amazon.com/eks/latest/userguide/getting-started-console.html
You can easily upgrade it to the latest by using below command:
For Linux, execute the below command, for other OS refer to below link:
curl "https://awscli.amazonaws.com/awscli-exe-linux-x86_64.zip" -o "awscliv2.zip"
unzip awscliv2.zip
sudo ./aws/install
https://docs.aws.amazon.com/cli/latest/userguide/getting-started-install.html
Above command will download the binaries and install the AWS CLI in your instance or override in case you have the older one.
In case new version does not appear then exit and re-login to machine as demonstrated below:

Now, we are going to install below item as prerequisites:
- kubectl
- Eksctl
- Required IAM Permissions to Instance
You can refer below link for more details:
https://docs.aws.amazon.com/eks/latest/userguide/getting-started-eksctl.html
Kubectl is a command line tool for working with Kubernetes cluster.
For Linux machine, execute the below command, for other OS refer the link below:
curl -o kubectl https://s3.us-west-2.amazonaws.com/amazon-eks/1.24.7/2022-10-31/bin/linux/amd64/kubectl
https://docs.aws.amazon.com/eks/latest/userguide/install-kubectl.html
Now, apply execute permissions to the binary, and copy the binary to a folder in your PATH, you can check the PATH by executing “echo $PATH” as mentioned below:
chmod +x ./kubectl

Check kubectl version …

Now, install eksctl by executing below command for Linux machine, for other OS refer the link below:
curl --silent --location "https://github.com/weaveworks/eksctl/releases/latest/download/eksctl_$(uname -s)_amd64.tar.gz" | tar xz -C /tmp
https://docs.aws.amazon.com/eks/latest/userguide/eksctl.html
Binaries got download into the tmp folder, go to tmp and copy the binary to a folder in your PATH, same as mentioned below.

Now, its time to create an IAM Role with required permissions and attached it to the Linux EC2 Instance.
Eks_role, get created with below permissions attached, I am giving the full access but you can refine the permission related things at your end accordingly.

At backend, EKSCTL utility is using CloudFormation to do all the cluster creation, so EC2 machine must have all the required permission to perform the actions.
Now, assign the role to EC2 Linux instance.


Now, using eksctl utility, we are going to create an EKS Cluster.
![]()
This will create a cluster with name “alok-devops” in Mumbai region with 2 worker node of type t2.small.
Please be aware. this not comes into free-tier.

CloudFormation Stacks get created for Kubernetes cluster using eksctl utility. During creation of stack and work efficiently it creates several roles, this is the reason we provided EC2 machine with permission of IAM full access.


Successfully created the EKS cluster with 2 worker node. It take approximately 18 min.
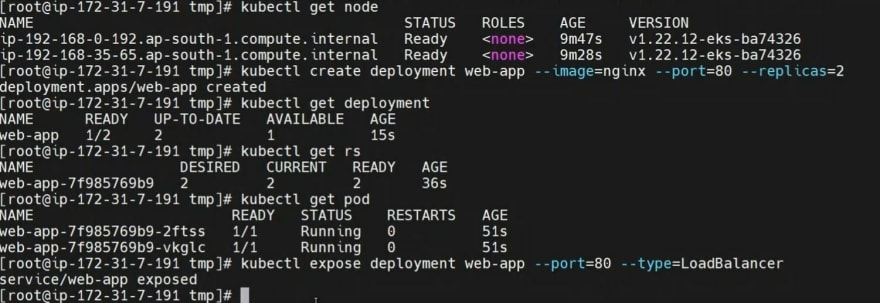
Now, its time to validate the cluster using few Kubernetes command using kubectl utility.
You can view complete setup on my youtube video:
https://www.youtube.com/watch?v=1O-I7NtwCeE


Post a Comment